Showing posts with label crafts; artwork. Show all posts

Wednesday, August 3, 2016

Mandalas and scrapbook paper unite

Oooooh...I have had this idea in my mind for a while now, and last weekend it worked its way out of my head and out through my hands. I knew there was a reason to save all that scrapbook paper!

The process was simple, really. I used my compass to draw some circles, then I cut the circles out and arranged them to create the base of my mandala. See the rings in the photo above? I cut those into eight pieces, and then freehand cut the petals. I still have some ink pads in my scrapbook stash, although they're pretty well dried out. The one I used for this piece was just enough to give the edges and tips a little color for added definition.


I glued my pieces to my sketchbook page with a glue pen and then I doodled...


I had cut the same size circles from a few different papers, so I created a second one with some of the other shapes I'd already cut out. Here's mandala #2:


Same colors, same basic shapes, unique mandala every time.

Upside-down photo, but that's ok. I laid down a few lines of doodle but it still needed something.


So I made dots - my go-to-fill-in technique. I used a thicker tipped Sharpie marker and started dotting.


So much fun.
So soothing and relaxing.
So many scrapbook papers...
limitless possibilities for mandalas.
I'll be with my sketchbook if you need me.

Wednesday, February 17, 2016

Making memories and dream catchers

Carrie and I hosted our 6th annual Valentine party this past weekend for a group of friends that we know from our days of working at a scrapbook store. Seriously? Best job ever. And truly, best friends ever.
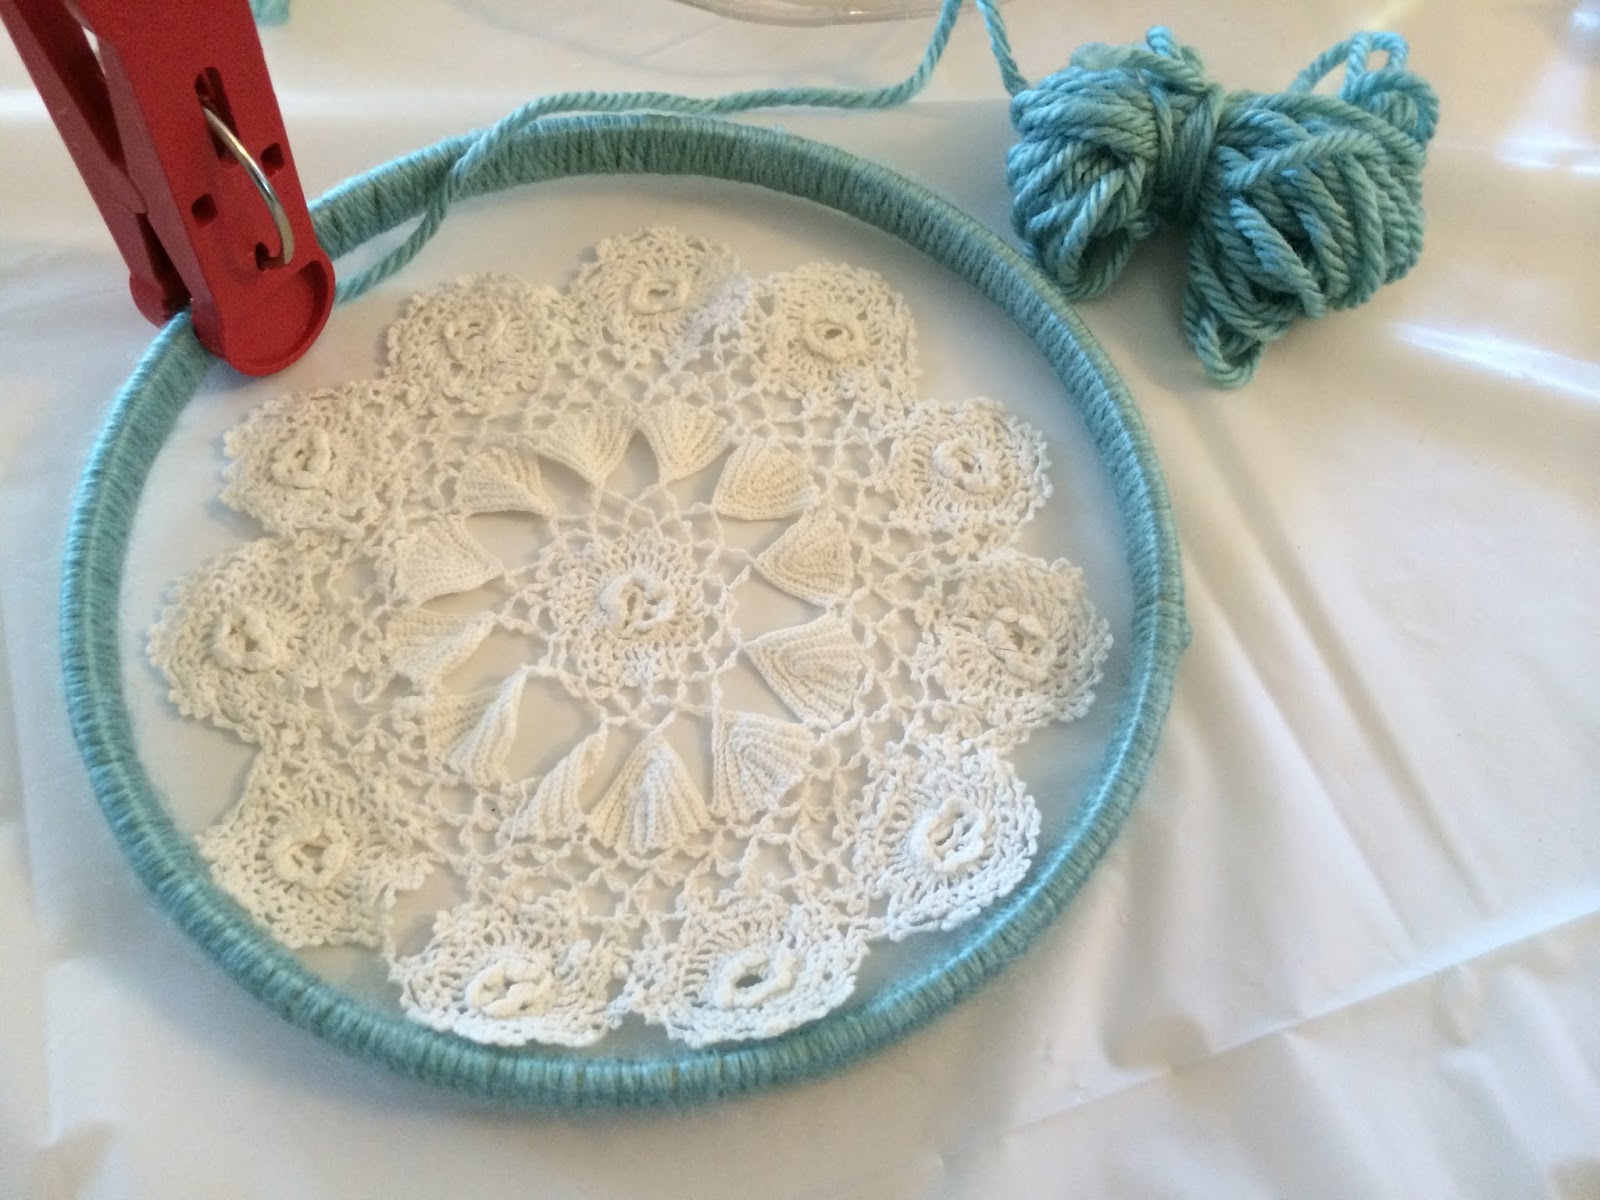
We used to have everyone bring their own craft or scrapbooking project to work on during our party, but the past couple of years we've organized a common craft to share. Last year we created Valentine banners/bunting, and this year we created dream catchers. Having a common craft takes a little pressure off of coming up with something on your own, and it's also cool because everyone brings a little bit of their own stash (in this case: yarn, ribbon, feathers, doilies...) and we share with each other.

Even though we created dream catchers, each was as unique as the hands that created it. It's always so fun to see everyone's own personal style shine through.

The dream catcher in the photo above is what I was able to complete during our time together. I still want to add some embellishments to the doily (like a brooch or some flowers), but overall I just love the colors and textures.

The photo below is what my dream catcher looked like in the early stages. The doily is one from my mom's collection that I inherited.

Jacie created these sweet little dream catchers to gift to her daughters for Valentine's Day.

And my Carrie made this cute little piece with gold string and sequins. Love the little feather tucked in the middle!

Jenn worked on a larger piece...

I love the vintage, southwestern feel to her piece!

Not everyone was into making dream catchers. One friend worked on a Valentine wreath, and one brought a knitting project. And a couple of friends just came to chat and hang out, which is always fine by us!
♥ ♥ ♥ ♥ ♥
This last bit has nothing to do with dream catchers, but I wanted to share this fun photo collage that Carrie created with photos of each of us holding our gifts for the exchange we do every year.
Top row: me, Betsy and Jenn
Middle row: Hollie, Carrie and Vee
Bottom row: Jacie, Barbara and Michelle


.
We call it our "I it" exchange and here's how it works: We ask our guests to bring five of one item they love, costing less than $5/item. We each put our name on five slips of paper and drop them in a cup, then we pass the cup and each person draws five names. We check to make sure we don't have duplicate names and/or our own name, and pass around slips of paper until everyone has five unique names.

One by one we stand up {except for Jenn, haha...} and tell about our item, and then we read the names on the five pieces of paper we drew. Those names are the friends who get one of the items we brought.

This year my thing to share was a Sharpie marker (personalized with "Deb & Daughter's V-day Crop 2016") and a mandala kit. Others brought their favorite lotion, lip balm, dish scrubber, etc. It's so much fun, and every guest leaves the party with five different items that other people love.


Oh, I love these ladies so much!!! I'm so grateful for the special friendship we have with each other, and I can't wait till next Valentine's Day to do this all over again!

As for the dream catchers, you can find more inspiration for DIYs on Pinterest. I have more embroidery hoops and a few more of my mom's doilies waiting to be turned into dream catchers, after my friendship quilt is done.

Wednesday, August 26, 2015

Mandala Canvas Art

I have been wanting to try my hand at a mixed media mandala and I finally had my chance this past weekend. I know, I know. We're moving and there's stuff to pack and sort and...well...I have to feed my soul somewhere in the mix too. :o)
 
I've made my share of mixed media canvases. I love the process of adding layers of color and texture to a canvas and seeing how the final piece emerges over the course of the project. It's just so fun and gratifying.

I actually started this canvas a couple of months ago by adhering some thrift store sheet music to a 12" x 12" canvas. Then I drew a loose mandala that I didn't care for right from the beginning. The layers of paper caught my pen as I drew, making the lines jagged and not pleasing to my eye. At the time I decided to step away from it for a while, vowing to come back to it at some point when I had the gumption to take it in a different direction.

Then I found myself in Louise Gale's online Mixed Media Mandala Class and this happened:

I added layers of acrylic paint, watered down a bit. I finally used an empty paper roll as a stamp and that was fun - will definitely do that again. The next photo is what my canvas looked like after about 30 minutes last Saturday morning. The word "REFRESHED" was placed on the canvas for photographic purposes only. I kind of liked it there...

I almost didn't want to cover this background with anything! It was just fun to look at imagine the possibilities, you know? But I am so glad I did cover it, because this just might be my favorite mandala ever!


I used watercolor paper to paint strips of paper and then cut the petals you see glued on my canvas. I love that the thick paper stands out and gives this piece more dimension. I used a fine black Sharpie sparingly, and a gold Uniball pen for pop. The rest of the lines and dots were added with acrylic paint.

This piece will hang in my new craft room some day, along with all the other mandala canvases that are surely in my future. As I type this morning, there's a partially completed pink/orange/white canvas to my right...

A girl's gotta' feed her soul, you know.

Monday, February 9, 2015

This Weekend's Valentine Party

Good Monday morning, blog friends.
And Happy Valentine's week to you.
Well, that might go down as the fastest weekend ever. It feels like I blinked and ~boom~ sweet memories. Ah...really sweet memories...


Carrie and I hosted our fifth annual Valentine party with our dear crafting friends. In the past, each guest brought their own craft project to work on, but we've discovered {as a group} that we love having a common craft to work on at our gatherings. We've created canvases and decorated boxes together, and this time we created Valentine banners/buntings/garlands.
 
Supplies were gathered and shared. We had such a fun time creating, chatting, snacking and just being together.


And of course, there were cupcakes...


Red velvet cupcakes by me, arrow cupcake toppers by Carrie. {She found the tutorial here.}


Helium balloons weighted down with a heart shaped rock. :o)

Candy. Candy. Candy. Candy.


Here's a look at my banner, and here's the part where I admit that I did not photograph anyone else's banner. How selfish of me. Ha! And shoot. I wish you could see what my creative friends made! It's always so fun to see how each of us takes the same general project and turns it in to our own unique creation. Next time...

We did our "I ____" exchange again this year. Each person brings five of one item they love and we exchange our favorites. So, everyone leaves with five different things that their friends love. I that Carrie always writes on the table cover what our favorites are. And I her cute handwriting. And I that she used a gold pen. And I totally her!


It's so fun that we have been hosting this Valentine party for five years now! We're already planning the next get together with our friends - maybe something for Easter if we're lucky. 

And with that I'm off to hit the yoga mat before I get ready for work. I have a busy week ahead, and I that I carry sweet weekend memories with me as I go.

Wishing each of you a week filled with wonderful things.

Monday, December 29, 2014

The joy of mandalas (a tutorial)

There's a beautiful mandala painted on one of the walls at the yoga studio where I practice. The design captivated my attention and drew me in the first time I saw it! In fact, I liked it so much that I started looking around for information on mandalas and specifically, tips on how to draw my own.


Part of my yoga teacher training graduation package included sharing an example of how I practice yoga off the mat. My original idea for that assignment was to compile my yoga blog posts into a booklet...but then I drew my first mandala. There's nothing like the meditative zone I find while being creative - it really is equivalent to yoga off the mat for me.

Patanjali's Yoga Sutra 1.2 ~ Yogas citta vrtti nirodhah ~ Yoga is the ability to direct the mind exclusively toward an object and sustain that direction without any distractions.


I decided to teach my fellow classmates how to draw a mandala for my final graduation project. We moved from the main classroom over to the one with the mandala on the wall for my presentation, and I loved the way my classmates honored me by participating so intently.

 Today I'm sharing a brief tutorial on how to draw your own mandala.

Mandala is a Sanskrit word that means circle. In a nutshell, mandalas have been used for centuries as sacred symbols in many cultures. They are commonly used as meditation/prayer tools by either gazing at a mandala that someone else has drawn, or by creating your own.

My rendition of how to draw a mandala and suggestions for how you can use it are my thoughts and observations after sifting through a whole bunch of mandala information. It's optional, but highly recommended, to think of an intention to hold while you create your mandala. Think of something you want in your life - peace, patience, a new job - and imagine how that would feel if you already had that going on for you.

Grab yourself a circle shape. I used a circle punch, but you could easily use a bowl or jar to trace a circle and cut it out. I folded the circle template in half in a few different directions to provide some grid lines to use as a template. You could also use a protractor, compass, you know - fancy tools...


To begin drawing, I trace the circle on my paper and put a little dot at each of the fold lines to mark my sections all the way around.

Once I have a few grid lines and dots on my paper, I start filling in the blanks. I like to draw lines across the inside of the circle, connecting the dots and crisscrossing - just letting the lines fall into place wherever it feels right.


And then scallops or flower petals around the outside edge...


Fill in or color the same shape all the way around the circle. Just start playing around with pencil lines and shapes, resist the urge to think too much about the process. Let the lines and shapes happen organically...


Continue to remind yourself of your intention as you begin to fill in the blank spaces, turning the paper as you go and continuing the pattern all the way around. You'll find yourself drifting into a flow, drawing lines and coloring in spaces. Therein lies the meditation aspect of drawing a mandala - you become lost within its design and effortlessly drift into harmony and relaxation.


Time was limited as I led my classmates in the mandala session, so I created a simple template as a starting point for drawing. You are welcome to download/print it by clicking here.
PS: The lotus flower watercolor art is mine too. I had PaperTurtle cards printed from Moo.com for my yoga teacher classmates so they could visit here and read my yoga posts if they choose. Hi yoga friends!!! xo

Wednesday, November 5, 2014

Muffin tin magnet collection


I have an unexpected collection of magnets. And by unexpected I mean that I didn't collect them on purpose, but it seems like the little plastic bag I kept putting them in was getting full and I wanted to have a way to display them other than all over the front of our refrigerator.


I've had this old muffin tin that I picked up at an estate sale a while back so I decided to finally scrub the thing off and hang it in my craft room so I could display my magnet collection.


I like it. And there's plenty of room for the collection to grow.
:o)

Tuesday, October 21, 2014

Yoga Journal - Old School Craft

Yo - guess what?! I crafted!
:o)

Ok, well, I crafted back in August and am just now blogging about it. :o)

When my yoga teacher training started, I took some time and covered a basic composition notebook to use for my note taking in class. I had a couple of large sheets of pretty paper I'd purchased years ago, so I busted those out, trimmed them to size, spread some Yes! paste and loved the results.

I placed a piece of wax paper between the cover and the book page until the paste dried to keep them from sticking together.

And I attached a couple of strands of ribbon to use as bookmarks by punching a hole in the top of the front cover and threading them through.

Truth be told, the ribbons kind of get in the way and aren't as handy as I thought they'd be, but I think they look pretty.

I'm 10 weeks in to a 19 week program and this book is almost full of yummy yoga notes. How can I ever go back to using a plain ol' composition notebook for volume two? Can't. Time to bring out the Yes! paste again...

Wednesday, October 1, 2014

Fall Crafting with Friends

Last weekend Carrie and I had the pleasure of spending time with a group of our crafting friends. It's always such a treat to spend time with these ladies, and our hostess, Barbara, went out of her way to make it a special time for us.

I told Barbara she wouldn't be in clear focus and I was right. Now I wish I'd changed my aperture so you could see her better!
Barbara loves Halloween, and her home was decorated so beautifully. It was so fun to walk around and look at all of the lovely details around her home.

I told you I was going to put your photo bomb on my blog, Carrie!
Barbara's daughter Summer did the witch painting when she was little. I love that Barbara has it in a frame!
Barbara had made kits for each of us and we spent some time covering matchboxes with a fun selection of papers. It was so much fun to be making something with a Halloween theme in the company of our creative friends.

Hot air balloon paper is Graphic 45's "Steampunk Spells" collection
Ghost paper is Little Yellow Bicycle's "Graveyard Ghosts"

Hooray for fall!
Hooray for Halloween fun!
Hooray for creative friends to love.
Related Posts Plugin for WordPress, Blogger...